Jekyll 手把手教程
Setup
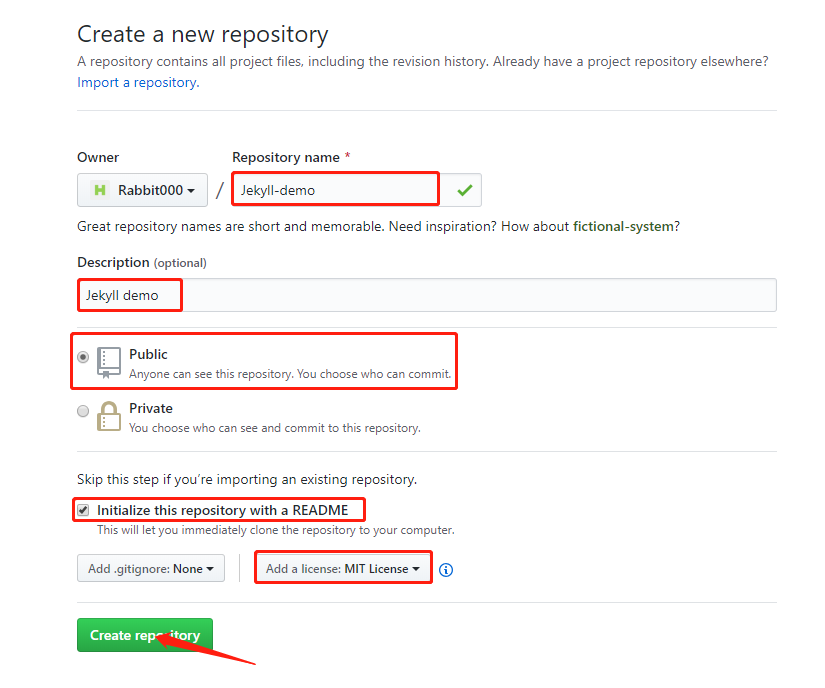
1. 创建 Git 仓库


2. 创建本地仓库
- 打开 Git Bash
$ git clone git@github.com:<your-git-username>/Jekyll-demo.git
3. 安装
- 安装Ruby (此处提供windows安装)
- 创建 Gemfile
$ bundle init
- 编辑 Gemfile
# Gemfile文末追加 gem "jekyll"
$ echo "gem \"jekyll\"" >> Gemfile
# 为你的项目安装jekyll, 会生成Gemfile.lock文件,里面包含了一些库的版本信息
$ bundle
后面的命令以bundle exec开头,确保使用Gemfile.lock 里定义的jekyll版本
4. 创建网站
- 创建 index.html 文件
$ vim index.html
<!doctype html>
<html>
  <head>
    <meta charset="utf-8">
	<title>Home</title>
  </head>
  <body>
    <h1>Hello World!</h1>
  </body>
</html>
5. 编译
- 编译网站,自动创建_site目录,包含静态网站内容
$ bundle exec jekyll build
- 本地运行, 浏览器查看效果 http://localhost:4000
$ bundle exec jekyll serve
Liquid
1. 介绍
Liquid 是一门开源的模版语言,包括三个主要部分:对象(objects), 标记(tags)和过滤器(filters)。
2. 对象(Objects)
告诉 Liquid 在哪输出内容,由双花括号标识:{{ 和 }}。
如: {{ page.title }} 页面输出 page.title 的内容
3. 标记(Tags)
创建模版的逻辑和控制流,由单括号+百分号标识: {
%和%}。
如:(去掉 { % 之间的空格)
{ % if page.show_sidebar %}
<div class="sidebar">
	sidebar content
</div>
{ % endif %}
如果条件page.show_sidebar为true,输出条件语句之间的内容。
4. 过滤器(filters)
改变Liquid对象的输出格式,由 符号分割。
如:(去掉大括号之间的空格)
{ { "hi" | capitalize }}
页面输出 Hi
更多详细内容查看 Liquid filters
或参考中文网站Liquid filters
5. 上手操作
修改index.html里的内容,刷新看结果
Jekll识别Liquid需要在文件顶部加上front matter, 三短线标识
…
<h1>{ { "Hello World!" | downcase }}</h1>
…
Front Matter
1. Front matter 是YAML语言的一个片段,包含在两行三短划线之间。
---
my_number: 5
---
2. 上手操作
修改index.html(去掉大括号之间的空格)
---
title: Home
---
<!doctype html>
<html>
  <head>
    <meta charset="utf-8">
    <title>{ { page.title }}</title>
  </head>
  <body>
    <h1>{ { "Hello World!" | downcase }}</h1>
  </body>
</html>
Layouts
Jekyll 同时支持 Markdown 文件
1. 在根路径下创建 about.md 文件
$ echo "" >> about.md
2. 创建 layout
Layouts模版 放置在 _layouts目录下
创建_layouts/default.html(去掉大括号之间的空格)
<!doctype html>
<html>
  <head>
	<meta charset="utf-8">
	<title>{ { page.title }}</title>
  </head>
  <body>
	{ { content }}
  </body>
</html>
$ mkdir _layouts
$ vim _layouts/default.html
# 复制上面内容到default.html
# 在index.html里使用default layout

3. 复制下面内容到about.md
$ vim about.md
---
layout: default
title: About
---
# About page

This page tells you a little bit about me.
访问 http://localhost:4000/about.html

Tips:
- 页面使用_layout里定义的模版,网页内容通过Front Matter的方式嵌入到模版的{{ content }} 之中。
- Markdown文件可替换html文件。
Includes
1. 介绍
之前建立了2个网站,需要导航,这里引入 include 标签.
include 的作用是从_includes目录下的文件中引入其内容
2. 上手操作
创建导航文件 _includes/navigation.html
$ mkdir _includes
$ vim _includes/navigation.html
<nav>
  <a href="/">Home</a>
  <a href="/about.html">About</a>
</nav>
将导航文件引入到_layouts/default.html模版文件中(去掉大括号之间的空格)
$ vim _layouts/default.html
<!doctype html>
<html>
  <head>
	<meta charset="utf-8">
	<title>{ { page.title }}</title>
  </head>
  <body>
	{ % include navigation.html %}
	{ { content }}
  </body>
</html>
访问 http://localhost:4000


3. 高亮当前页面
page.url 是当前页面的相对路径
修改导航文件 navigation.html (去掉{ %之间的空格)
$ vim _includes/navigation.html
<nav>
  <a href="/" { % if page.url == "/" %}style="color: red;"{ % endif %}>
	Home
  </a>
  <a href="/about.html" { % if page.url == "/about.html" %}style="color: red;"{ % endif %}>
	About
  </a>
</nav>

Data Files
1. 介绍
Jekyll支持从_data目录下的YAML, JSON, CSV文件里加载数据
2. 上手操作
这里使用YAML 文件来存储导航内容(包含name 和 link)
在_data目录下创建数据文件 navigation.yml
$ mkdir _data
$ vim _data/navigation.yml
- name: GoToHome
  link: /
- name: GoToAbout
  link: /about.html
通过 site.data.navigation 存储导航内容,通过变量指代的方式引用其数据。(去掉{ %之间的空格)
$ vim _includes/navigation.html
<nav>
  { % for item in site.data.navigation %}
	<a href="{ { item.link }}" { % if page.url == item.link %}style="color: red;"{ % endif %}>
	  { { item.name }}
	</a>
  { % endfor %}
</nav>

Tips:
_includes/navigation.html
只需要写导航的逻辑结构,其内容写在_data/navigation.yml中并存储在集合site.data.
里,通过变量引用集合里的值。
Assets
1. 介绍
assets目录存放CSS,JS, images等网站资源
2. 上手操作
$ mkdir assets
$ cd assets
$ mkdir css
$ mkdir images
$ mkdir js
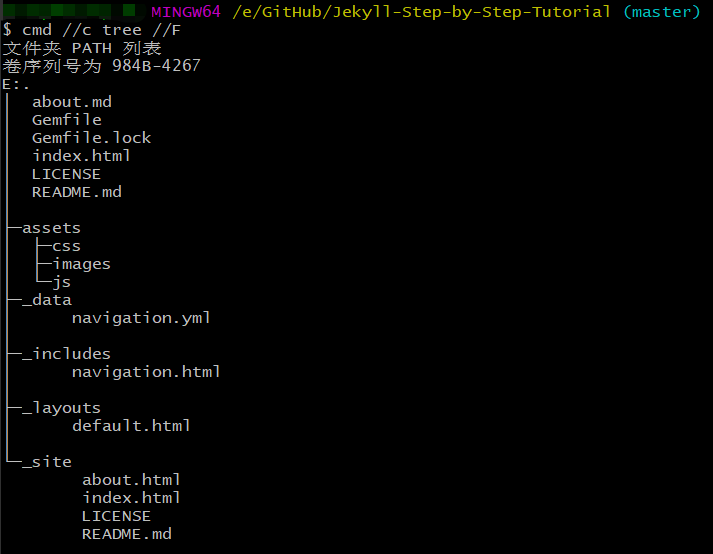
查看目录结构,Git Bash使用cmd的 tree命令, tree /F 显示文件夹及其文件
$ cmd //c tree //F

使用 Sass 来显示样式
$ vim _includes/navigation.html
<nav>
  { % for item in site.data.navigation %}
	<a href="{ { item.link }}" { % if page.url == item.link %}class="current"{ % endif %}>{ { item.name }}</a>
  { % endfor %}
</nav>
在目录/assets/css/下创建Sass文件 styles.scss
$ vim assets/css/styles.scss
---
---
@import "main";
import “main”指导入根路径下的_sass/ 目录下的main.scss文件
创建main.scss文件
$ mkdir _sass
$ vim _sass/main.scss
.current {
  color: green;
}
在模版的<head>里引入样式表
$ vim _layouts/default.html
<!doctype html>
<html>
  <head>
	<meta charset="utf-8">
	<title>{ { page.title }}</title>
	<link rel="stylesheet" href="/assets/css/styles.css">
  </head>
  <body>
	{ % include navigation.html %}
	{ { content }}
  </body>
</html>
刷新 http://localhost:4000 查看效果

Tips:
_sass/目录下存css内容
assets/css/目录下 @import css内容
模版<head>通过 呈现样式
1. _layouts模版<head>里引入样式表stylesheet, <link rel="stylesheet" href="/assets/css/<filename>.scss">
2. 样式表放在assets/css/目录下styles.scss
3. css内容在_sass/目录下main.scss,并通过@import “<scss_file_name>” 导入到styles.scss里
Blogging
1. 介绍
博客只由text文件驱动。
存放在_posts/目录下
博客文件命名规则:yyyy-mm-dd-<title>.md
2. 上手操作
在_posts/目录下创建帖子
$ mkdir _posts
$ vim _posts/2019-08-09-bananas.md
---
layout: post
author: jill
---
A banana is an edible fruit – botanically a berry – produced by several kinds
of large herbaceous flowering plants in the genus Musa.

In some countries, bananas used for cooking may be called "plantains",
distinguishing them from dessert bananas. The fruit is variable in size, color,
and firmness, but is usually elongated and curved, with soft flesh rich in
starch covered with a rind, which may be green, yellow, red, purple, or brown
when ripe.
md文件需要有front matter ,layout 及其他非必须变量(title, author)
创建对应的layout: post
$ vim _layouts/post.html
---
layout: default
---
<h1>{ { page.title }}</h1>
<p>{ { page.date | date_to_string }} - { { page.author }}</p>

{ { content }}
这里的{ { content }}指代调用该模版的文件的内容,这里指博客帖子的内容
page 可能指代全局变量
site.posts 存储post文件
创建blog.html 主页面
$ vim blog.html
---
layout: default
title: Blog
---
<h1>Latest Posts</h1>

<ul>
  { % for post in site.posts %}
	<li>
	  <h2><a href="{ { post.url }}">{ { post.title }}</a></h2>
	  <p>{ { post.excerpt }}</p>
	</li>
  { % endfor %}
</ul>
post.excerpt 指代default 的第一段内容
在导航数据里加上Blog导航栏
$ vim _data/navigation.yml
- name: Home
  link: /
- name: About
  link: /about.html
- name: Blog
  link: /blog.html
多创建几个post
$ vim _posts/2018-08-20-apples.md
---
layout: post
author: jill
---
An apple is a sweet, edible fruit produced by an apple tree.

Apple trees are cultivated worldwide, and are the most widely grown species in
the genus Malus. The tree originated in Central Asia, where its wild ancestor,
Malus sieversii, is still found today. Apples have been grown for thousands of
years in Asia and Europe, and were brought to North America by European
colonists.
$ vim _posts/2019-07-21-kiwifruit.md
---
layout: post
author: ted
---
Kiwifruit (often abbreviated as kiwi), or Chinese gooseberry is the edible
berry of several species of woody vines in the genus Actinidia.

The most common cultivar group of kiwifruit is oval, about the size of a large
hen's egg (5–8 cm (2.0–3.1 in) in length and 4.5–5.5 cm (1.8–2.2 in) in
diameter). It has a fibrous, dull greenish-brown skin and bright green or
golden flesh with rows of tiny, black, edible seeds. The fruit has a soft
texture, with a sweet and unique flavor.
刷新页面查看效果

Tips:
- layout:
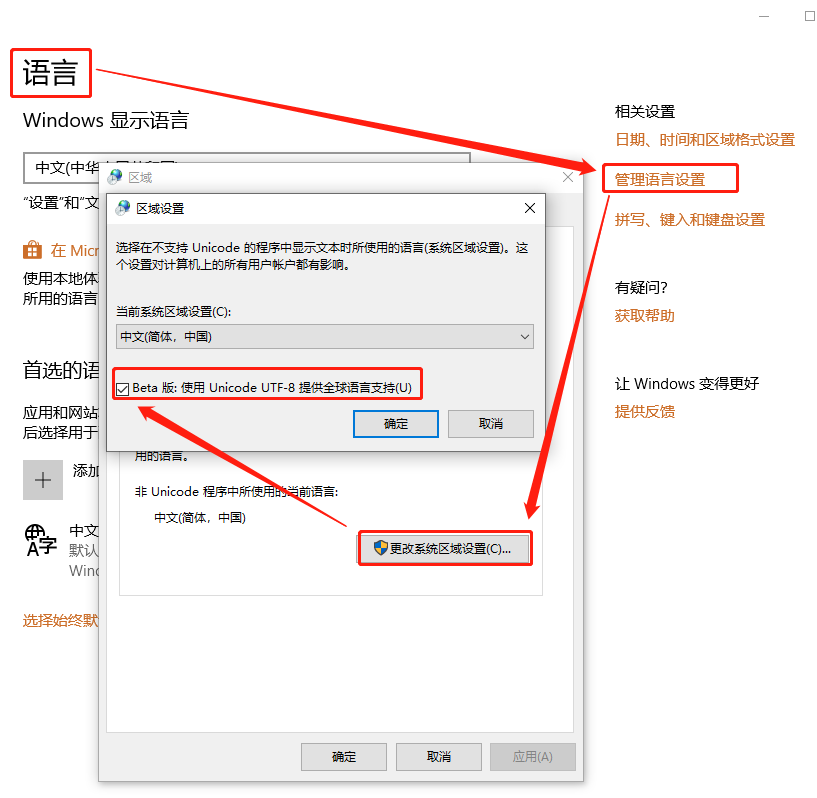
冒号和文件名之间必须要有个空格,否则不生效 - 文章的内容编码要是UTF-8格式,否则报invalid byte sequence in UTF-8
- 由于之前Git Bash中文乱码问题,设置Git Bash为GBK格式,所以复制内容时-的格式不正确。
- 强烈建议将Windows10的编码设置为utf-8(需要重启电脑)。

Collections
1. 介绍
Collections 跟post类似,不需要按时间排序,充实作者,使其拥有自己的简介和博文。
2. 上手操作
Jekyll的配置文件默认为_config.yml文件
根目录下创建_config.yml配置文件
$ vim _config.yml
collections:
  authors:
该配置需要重启jekyll server
Ctrl+C终止服务,并重启
$ bundle exec jekyll serve
文档(collection的元素)存在根路径下的_<collecion_name>文件夹中,这里为_authors
$ mkdir _authors
为每个作者创建一个文档
$ vim _authors/jill.md
---
short_name: jill
name: Jill Smith
position: Chief Editor
---
Jill is an avid fruit grower based in the south of France.
$ vim _authors/ted.md
---
short_name: ted
name: Ted Doe
position: Writer
---
Ted has been eating fruit since he was baby.
创建模版列举作者信息, 作者信息包含在 site.authors集合里
$ vim staff.html
---
layout: default
title: Staff
---
<h1>Staff</h1>

<ul>
  { % for author in site.authors %}
	<li>
	  <h2>{ { author.name }}</h2>
	  <h3>{ { author.position }}</h3>
	  <p>{ { author.content | markdownify }}</p>
	</li>
  { % endfor %}
</ul>
通过markdownify过滤器来执行当前内容,并自动在包含{ { content }}的layout中输出
导航数据中加入 staff
$ vim _data/navigation.yml
- name: Home
  link: /
- name: About
  link: /about.html
- name: Blog
  link: /blog.html
- name: Staff
  link: /staff.html
每个作者拥有自己的网页, 默认不自动输出
$ vim _config.yml
collections:
  authors:
	output: true
$ vim staff.html
---
layout: default
---
<h1>Staff</h1>

<ul>
  { % for author in site.authors %}
	<li>
	  <h2><a href="{ { author.url }}">{ { author.name }}</a></h2>
	  <h3>{ { author.position }}</h3>
	  <p>{ { author.content | markdownify }}</p>
	</li>
  { % endfor %}
</ul>
创建作者模版
$ vim _layouts/author.html
---
layout: default
---
<h1>{ { page.name }}</h1>
<h2>{ { page.position }}</h2>

{ { content }}
让作者文档使用layouts
配置 front matter defaults, 指定对应的集合用对应的layout, 默认的使用default
type 表示的是集合, layout 表示对应的layout页面,其他front matter 里的layouts可以注释掉。
$ vim _config.yml
collections:
  authors:
	output: true

defaults:
  - scope:
	  path: ""
	  type: "authors"
	values:
	  layout: "author"
  - scope:
	  path: ""
	  type: "posts"
	values:
	  layout: "post"
  - scope:
	  path: ""
	values:
	  layout: "default"
列举作者的博文
$ vim _layouts/author.html
---
layout: default
---
<h1>{ { page.name }}</h1>
<h2>{ { page.position }}</h2>

{ { content }}

<h2>Posts</h2>
<ul>
  { % assign filtered_posts = site.posts | where: 'author', page.short_name %}
  { % for post in filtered_posts %}
	<li><a href="{ { post.url }}">{ { post.title }}</a></li>
  { % endfor %}
</ul>
超链接到作者信息页面
修改post模版
$ vim _layouts/post.html
---
layout: default
---
<h1>{ { page.title }}</h1>

<p>
  { { page.date | date_to_string }}
  { % assign author = site.authors | where: 'short_name', page.author | first %}
  { % if author %}
	- <a href="{ { author.url }}">{ { author.name }}</a>
  { % endif %}
</p>

{ { content }}
http://localhost:4000 查看效果
Develoyment
1. 介绍
Gemfile 确保了Jekyll和其他gem的版本在不同的环境中保持一致。
2. 上手操作
根目录下创建 Gemfile
$ vim Gemfile
source 'https://rubygems.org'

gem 'jekyll'
安装gems 并创建 Gemfile.lock文件(锁定当前gem版本)
如果要更新gem版本,可以使用 bundle update命令
$ bundle install
使用Gemfile文件,确保只使用 Gemfile里设置的gems
$ bundle exec jekyll serve
3. 官方插件
jekyll-sitemap 创建sitemap帮助搜索引擎索引内容, 在编译时创建sitemap
jekyll-feed 为您的文章创建一个RSS源需要在_layouts/defaut.html 的<head>里添加标签{ % feed_meta %}
jekyll-seo-tag 添加元标签,以帮助搜索引擎优化需要在_layouts/defaut.html 的<head>里添加标签{ % seo %}
使用插件前需要加入到Gemfile
source 'https://rubygems.org'

gem 'jekyll'

group :jekyll_plugins do
  gem 'jekyll-sitemap'
  gem 'jekyll-feed'
  gem 'jekyll-seo-tag'
end
并且在_config.yml配置
plugins:
  - jekyll-feed
  - jekyll-sitemap
  - jekyll-seo-tag
4. 上手操作
$ bundle update
$ vim _layouts/defaut.html
<!doctype html>
<html>
  <head>
	<meta charset="utf-8">
	<title>{ { page.title }}</title>
	<link rel="stylesheet" href="/assets/css/styles.css">
	{ % feed_meta %}
	{ % seo %}
  </head>
  <body>
	{ % include navigation.html %}
	{ { content }}
  </body>
</html>
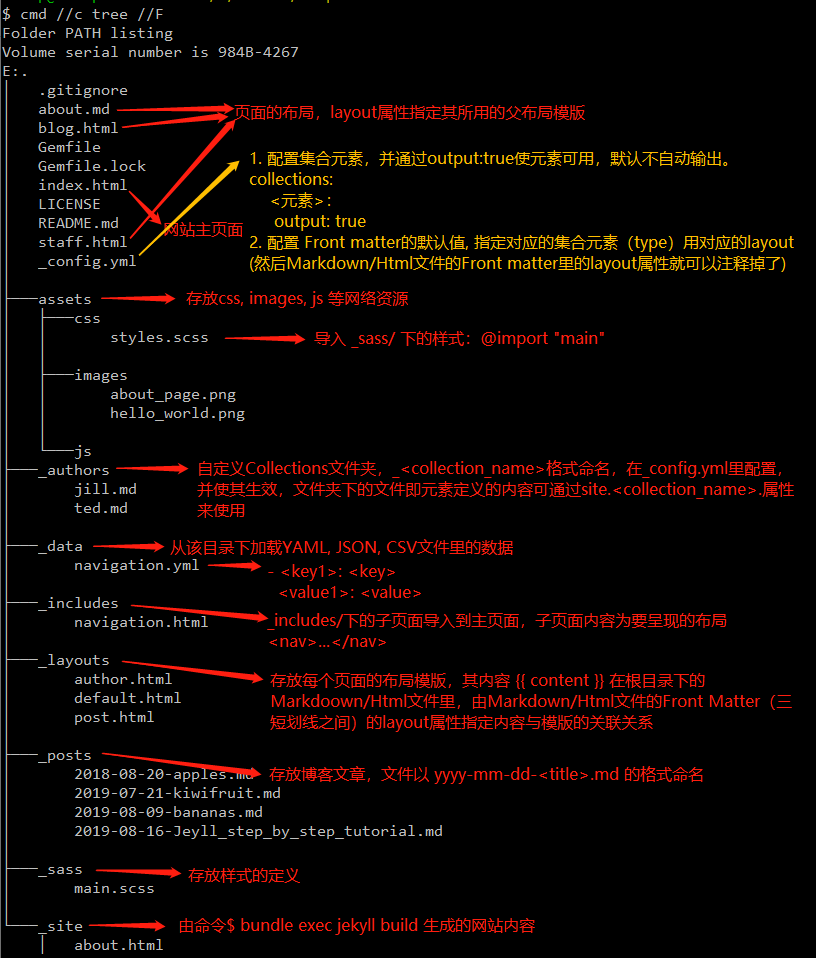
Jekyll 网站架构说明

